When you’re managing a commercial property in San Diego, a roofing proposal is more than just a line item. It’s a major capital expense and a disruption to your tenants. Understanding the TPO roofing installation process, from the first truck arriving to the final seam weld, helps you vet your contractor and ensures you get the 20- or 30-year roof you paid for. This is what the process actually looks like, step-by-step.
What gets installed (and what gets torn off) on day one
The first day of a TPO install is all about preparation and demolition. Before a single roll of white membrane is unfurled, the roofing crew focuses on setting up a safe, efficient work site and assessing the roof deck that will serve as the foundation for the new system.
First, we establish a secure perimeter and a plan for material staging and debris removal. This usually involves placing a dumpster in a pre-approved location and protecting landscaping, windows, and walkways below the work area. We also coordinate with you to minimize disruption to your tenants’ access and parking.
The next major step is the tear-off. San Diego building codes typically allow for a maximum of two roofing layers. If your building already has two, a complete tear-off down to the structural deck is mandatory. Even if there’s only one layer, we often recommend a full tear-off to properly inspect the underlying wood or metal decking for water damage, dry rot, or structural issues. A new roof is only as good as the foundation it’s built on.
During the tear-off, a roofer will remove the old membrane, any saturated insulation, and old flashing materials. A qualified roofer will inspect the entire roof deck, replacing any damaged plywood or OSB sheathing. This is a critical checkpoint. Covering up a weak or rotting deck is a recipe for premature failure, and it’s something a less reputable contractor might do to save time. Once the deck is clean, sound, and dry, it’s ready for the new roofing system to be installed.
Insulation, fasteners, and the seam-welding step that matters most
With a clean substrate, the TPO system build-up begins. This multi-layer process is where precision and technical skill become paramount. It’s not just about rolling out a white sheet; it’s about creating an integrated, watertight, and energy-efficient roofing assembly.
First comes the insulation. The typical choice is polyisocyanurate (polyiso) rigid foam boards. These boards provide a high R-value per inch, helping your building comply with California’s Title 24 energy standards and lowering your cooling costs under the San Diego sun. The boards are laid out in a staggered pattern to eliminate thermal bridging and are secured to the roof deck.
The attachment method is key. For most San Diego commercial buildings, a mechanically attached system is the standard choice. This involves driving screws and plates through the insulation and into the structural deck in a specific pattern engineered to meet wind uplift requirements. In some cases, such as on concrete decks or for aesthetic reasons, a fully adhered system using a powerful bonding adhesive might be used. The full breakdown on 150 mph wind-rated shingles for San Diego goes deeper.
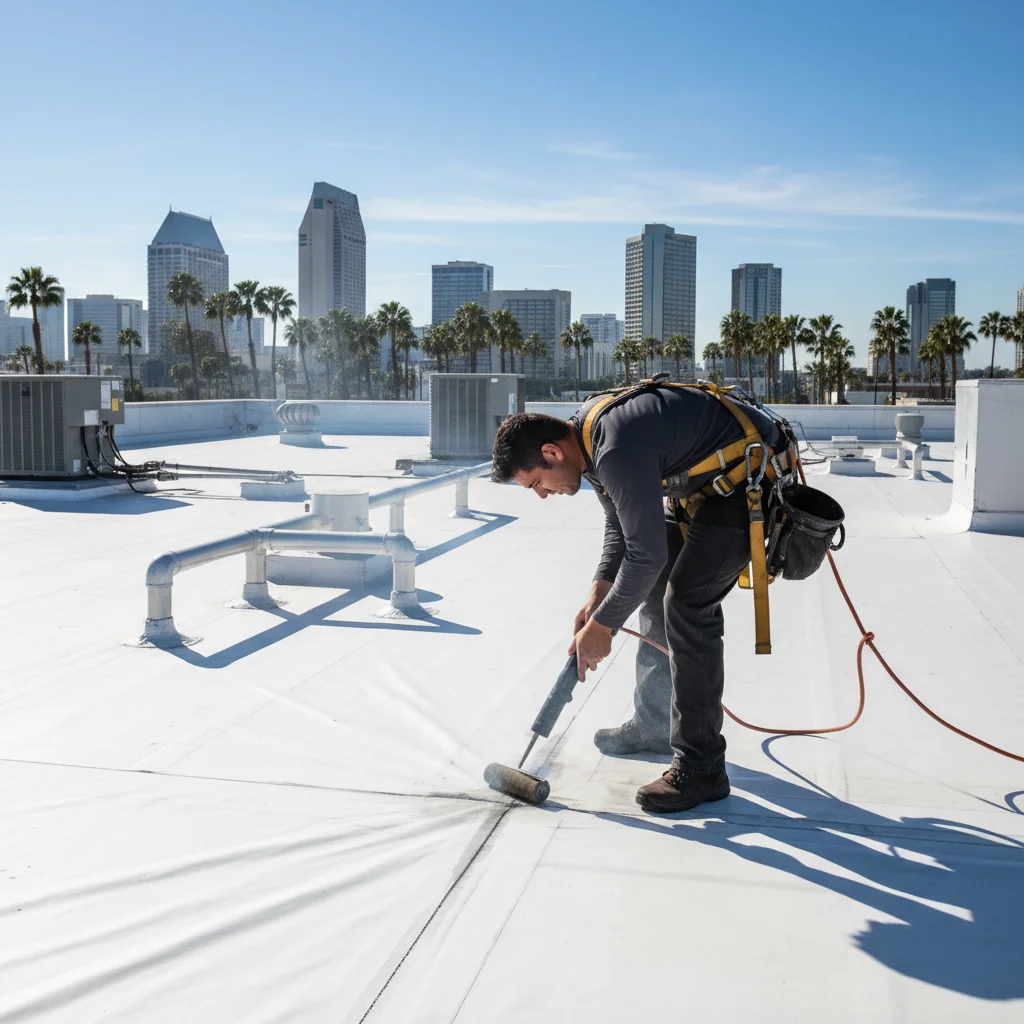
Next, the TPO membrane is rolled out over the insulation. The real magic happens at the seams. TPO (Thermoplastic Polyolefin) is a single-ply membrane that is fused together with hot air. Using a robotic heat welder for the long, straight runs and a hand welder for details, qualified technicians heat the membrane to between 700°F and 1150°F. The exact temperature depends on the membrane thickness, ambient temperature, and humidity. This process melts the top and bottom layers of the overlapping sheets, fusing them into a single, monolithic piece of plastic that is stronger than the membrane itself. This heat-welded seam is far superior to the adhesives and tapes used on other roofing systems.
How long a TPO install takes on a typical commercial roof
Property managers always need a timeline for planning and tenant communication. While every project is unique, a qualified roofer can provide a general idea of the duration based on the size and complexity of a commercial roof in San Diego County.
A smaller standalone commercial building, around 5,000 square feet, might take a skilled crew 3 to 5 business days, assuming good weather and no major deck repairs. A medium-sized retail center or industrial building in the 20,000 to 30,000 square-foot range will likely take 1 to 2 weeks. For very large projects, like a 100,000+ square-foot warehouse or distribution center in Otay Mesa, the project can extend to several weeks or even months, often completed in phases.
Several factors influence this schedule:
- Tear-off vs. Recover: A full tear-off adds significant time for demolition and debris removal compared to an overlay.
- Deck Condition: Discovering extensive rot or damage after tear-off can add days to the project for carpentry repairs.
- Rooftop Equipment: The number of HVAC units, skylights, vents, and pipes drastically increases labor time. Each penetration requires meticulous, time-consuming detail work and hand-welding.
- Weather: While San Diego’s climate is generally cooperative, strong Santa Ana winds can halt work for safety reasons, and unexpected rain can cause delays.
- Access and Logistics: The ease of getting materials to the roof and debris down to the dumpster can also impact the daily workflow.
A professional roofing contractor will provide a detailed project schedule and keep you updated daily on progress and any unforeseen issues that might affect the timeline.
Common install mistakes that void the warranty
A manufacturer’s warranty for a TPO system is a powerful guarantee, but it’s contingent on the material being installed exactly to specification. Cutting corners or simple inexperience can lead to mistakes that void the warranty and cause your new roof to fail prematurely. Hiring a certified installer is your best defense against these issues.
Here are the most common installation errors that show up:
- Improper Seam Welds: This is the number one cause of TPO failures. A “cold weld” occurs when the temperature is too low or the welder moves too fast, resulting in a seam that isn’t fully fused and can peel apart over time. Conversely, welding too hot or too slow can scorch the membrane, making it brittle and prone to cracking.
- Incorrect Fastener Installation: Over-driving fasteners can crush the insulation and create a weak point in the membrane (a “fastener back-out”). Under-driving them leaves a raised nub that can wear a hole in the TPO over time. The fastening pattern must also match the manufacturer’s engineering specs for wind uplift.
- Poor Flashing Details: Leaks almost always start at penetrations. Flashing around pipes, curbs, and walls must be perfectly cut, fitted, and welded. Sloppy corner welds or inadequate seals are a major red flag. This is where craftsmanship truly shows.
- Contamination: Welding a TPO seam requires a perfectly clean surface. Any dirt, dust, or moisture trapped in the overlap will prevent a proper weld, creating a hidden void that will eventually let water in. A professional crew is constantly cleaning the membrane ahead of the welder.
These mistakes are why it’s so important to work with a licensed, experienced commercial flat roof installation team. You can verify any California contractor’s license and insurance status on the CSLB website. For more on this, see 2026 flat roof replacement cost in San Diego.
What property managers should be on-site to verify
As a property manager, you don’t need to be a roofing expert, but you can be an informed client. By observing a few key things during the installation, you can get a good sense of the quality and professionalism of the crew working on your building.
First, observe the site’s organization and cleanliness. A professional crew maintains a tidy work area, stages materials safely, and performs a thorough cleanup at the end of each day. This respect for your property is often a direct reflection of their respect for their craft.
Second, ask about material storage. Rolls of TPO and bundles of insulation should be kept covered and dry on the roof when not in use. Prolonged exposure to the elements before installation can compromise the materials.
Third, look for proactive communication. The site foreman or project manager should be able to give you a clear update on what was accomplished that day and what the plan is for the next. Don’t be afraid to ask questions.
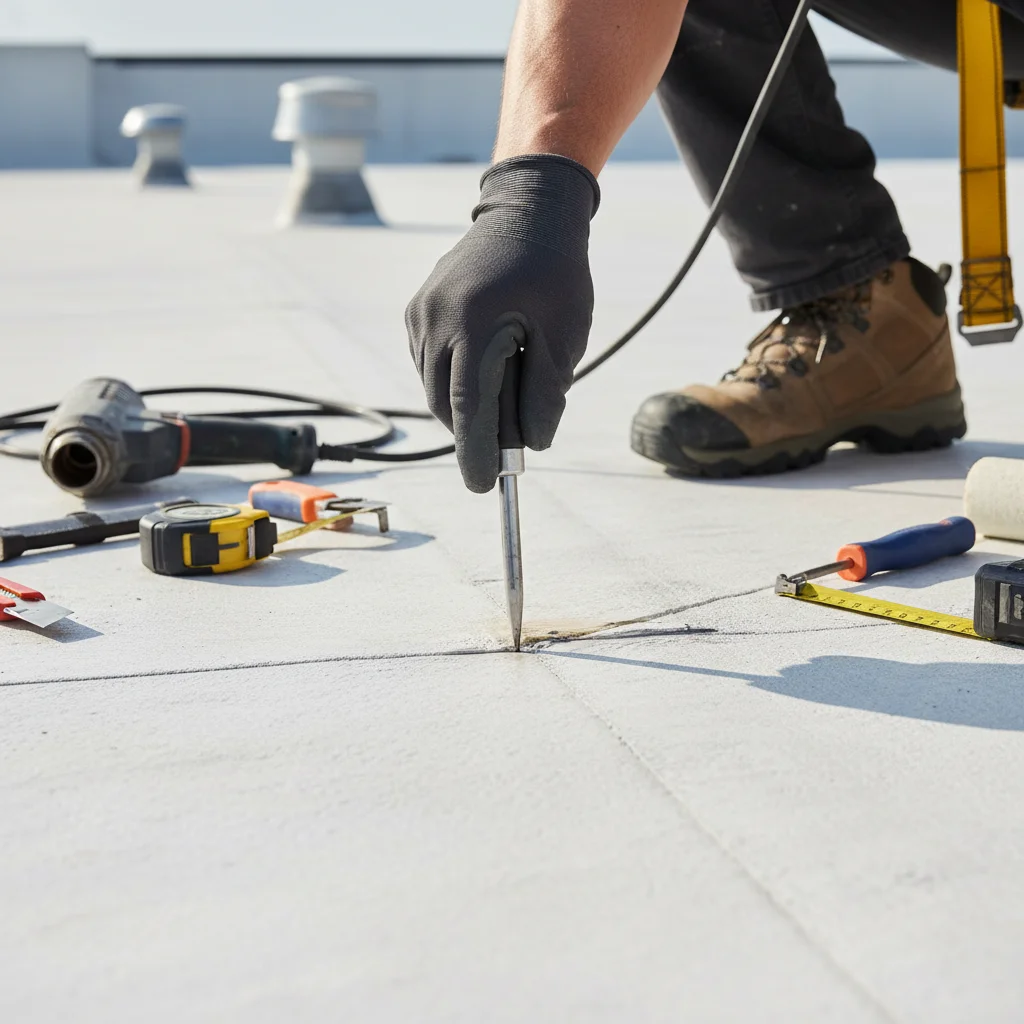
Finally, ask to see a seam probe test. This is a simple but critical quality control check. The technician uses a small, dull-pointed tool to trace the edge of a freshly welded seam, feeling for any voids or un-welded spots. A quality crew performs this check constantly throughout the day on every single weld. Seeing this simple test in action provides powerful reassurance that the most critical part of the job is being done right. A finished TPO roof should look clean, uniform, and solid, a stark contrast to the tar and gravel of older systems like modified bitumen, which you can learn more about in our TPO vs. modified bitumen comparison.
When to call us
When you need a TPO roofing system installed to the highest manufacturer standards, it requires a team with specialized equipment and certified training. From the initial tear-off to the final heat-welded seam, every step needs to be done correctly to ensure a long-lasting, watertight roof for your commercial property.
Call us at (760) 750-5557 for a same-day estimate.